ABC started their streaming service on their website today. Users from the USA are able to watch episodes of Lost, Desperate Houswives, Alias and others right from the website. Unfortunatly they check your IPs origin and decline access if the whois turns out to be from outside the USA. But as always, there is a way around this restriction.
This is slighty complex but you should get used to the procedure. All you need is a http proxy that is hosted inside the USA and does not spill your IP address. To achieve this you need a application that checks proxy servers for those variables. I recommend Charon for this task but you could use other tools as well.
Download Charon from the website mentioned, you don´t need to install it at all, just extract the contents to a directory of your choice.
Fire it up, you have no proxy list yet so you could use google to find some lists or let charon do that for you. Simply select Check Proxies and then Scan Search Engines for new Proxies. Charon will find some proxies that are then displayed in the table. Those are unverified, now select Check Proxies and Check Anonymity of all Proxies. This might take some time. If you only recieve bad and timeouts you have to change one option in charon.
Select Connect Options and chose Use External Judge(s).
Let it test the proxies. If you have enough good ones or a finished test sort the proxies by the Country tab. Only USA proxies are working so we need one of those. The Anonymity tab should state YES. If both are correct right click the line and select Copy to clipboard and Copy selected IP:Port.
Open your browser and paste the proxy address into its proxy settings. For firefox you select Tools >> Options >> Connection Settings >> Manual Proxy Configuration and add the proxy and port there. Close the options and visit the abc streaming site. If you see a Launch button you are ready to enjoy the tv shows. If not try another proxy from the list.
I checked the service with this proxy and it worked flawlessly: 192.104.67.250 port:8080
Enjoy the shows.
how to watch ABC TV streams outside the USA
0 comments Filed Under: NETWORK HACKING
Boost up your PC
Launch Your Favorite Applications Faster
 The more often you use a particular application, the faster it’ll perform. eBoostr gathers statistics on what applications you use and how often, optimizing their performance by pre-caching their files and data and allowing faster access speed and reduced delays.
Boot and Work Faster
 eBoostr makes Windows load faster, significantly reducing the time your computer needs to boot.
No Hardware Upgrades
 No need to disassemble your PC in order to upgrade its performance. eBoostr gives your PC a noticeable performance boost without costly hardware upgrades. Just plug one or more flash memory drives, install eBoostr and say “Yes” to speed up your computer.
Utilize Available RAM Better
 eBoostr features a SuperFetch-like solution and makes use of the otherwise wasted free RAM to store frequently accessed files and data. Every time you launch you favorite application, it’ll load much faster because of the preloaded data in RAM. If your computer has over a gigabyte of memory, you’ll see a significant increase in speed and responsiveness.
Laptops Benefit More
 Speed up your laptops even more! Upgrading a laptop is difficult and costly, but not with eBoostr. Notebook hard drives are slower than their desktop counterparts, thus they benefit more from the use of flash memory with eBoostr and reduced hard drive activities.
Save Battery Power
 Work longer with a battery. Less hard drive access results in reduced power consumption, which leads to improved battery life. Work faster and longer on your Windows XP laptop with eBoostr.
Highlights
- Vista’s ReadyBoost and SuperFetch benefits on your Windows XP PCs;
- Smart caching of frequently used applications and files for maximum performance;
- Supports both USB and non-USB removable media devices (CF, SD/SDHC, MMC, xD and other memory cards), as well as additional hard disks;
- Allows up to 4 devices for simultaneous smart caching;
- Cache file size of up to 4GB on each device (NTFS has no limit on the size);
- Compatible with all “Enhanced for ReadyBoost” devices.
3 comments Filed Under: download, E booster, ebooster, free
Convert and Burn AVI (divx / xvid / mp4 / x264 / AAC) to DVD (VOB) / VCD
How do you burn movies or video which you have encoded under compressed codec formats as divx / xvid / mp4 / x264 / AAC ??
But before I start, I would remind you that if you only want to view the movies / videos at your PC / Notebook, then let them be under those Compressed format, as it saves a lot of disk space… If you have a problem on viewing them because of codec issue then either use VLC Media Player or download and install any codec pack, such as K-Lite or CCCP…
Do note, many modern DVD player supports MP4 / xvid / divx so even if you want to view the movie / video via your DVD player then check if it has the support for this codecs or not… If it has, then simply burn a DVD using Nero or any such software as DATA DVD and your DVD player (if it supports any or those codec) would be able to play the video !!!
This guide is for those who has an older DVD / VCD player which doesn’t support any of those codecs… This guide would explain step by step process on how to convert the divx / xvid / mp4 / x264 / AAC files and burn them in to DVD / VCD to make sure your player reads and play them !!!
How do I convert and burn AVI (divx / xvid / mp4 / x264 / AAC) video / movie file to a DVD / VCD ??
Before you start, few point you need to keep in mind… Under video DVD (.vob) format one single DVD5 (4.7GB DVD) may hold maximum up to 120 mins video… Where as a single VCD disk (700 MB CD-R) would hold up to 80 mins of video…
For video format size is not a matter, so suppose you have a 180 mins of movie or video encoded in a 1.4 GB AVI file, means you will need 2 DVD disk to burn the DVD… Dont get confuse that one DVD holds 4.7 GB means you may put 2 or more DVD Rips under it… Same applies with VCD too, a single VCD will hold max up to 80 mins of video… So if you have 160 mins of encoded video under a 700 MB rip, would mean you need to have at-least 2 CD-R for the job….
So if you have any 700 MB rip with more than 80 mins (for VCD) or 120 mins (for DVD) of video in it, then use any free AVI splitter to split the AVI files in 2 or more as per your need !!!
One click tool for the converting and burning job would be Nero Vision (Part of Nero)…
Nero vision comes with converting and burning tool… So, bellow is the easiest process to Convert and Burn AVI (divx / xvid / mp4 / x264 / AAC) to DVD (VOB) / VCD…
Quick Tip : If you are using Windows Vista, do note, there is a bug with Nero Vision version 5 (which come with Nero 8 ) therefore use Nero Vision 4 (which comes with Nero 7.10 and which is fully compatible with Windows Vista) for your job… If you have Windows XP / 2003 or 2000 you may use any of the version !!!
Start Nero Vision, in my case its Start >> Nero 7 >> Photo and Video >> Nero Vision…
At application main windows Click Make CD >> Video CD or Make DVD >> Video DVD
At the nest step, Click Add Video files
Browse and add the video file you want to add, do keep in mind, it doesn’t matter what is the size of the file, what matters is what is the length of the video… For VCD it needs to be lower than 80 mins and for DVD it needs to be lower than 120 mins… !!!
Click Next to go the next step and here you may create menu for the disk, but I prefer without menu !!!
So you may just select Do not create a menu from the drop down list to proceed to next step…
At the burning point, Choose your burner if you have more than 2 burner under your PC…
Now go to Recording settings, and chose your Speed in which you want the DVD or VCD to be burn… For VCD I would say 16x where as for DVD it should be not more than 8x….
Now you are ready to burn the Disk… Do note for converting and imaging purpose Nero will need about 800 MB for a VCD and 5 GB free space for a DVD under your C (windows drive) for create the temp files… So click burn to start the process…
With my Core 2 Duo E6600 Over Clocked at 3.6 GHz and 4 GB DDR-II it takes about 6 mins to complete a AVI to VCD encoding !!! Same process with same file takes 40 mins with Pentium 4 631 with 2 GB DDR-II !!!
After Nero Completes the encoding and creates the VCD writable file, it would proceed towards the burning that in the disk…
The burning process takes same time with any system which is around 8 mins for a 700 MB VCD written at 16x speed….
0 comments Filed Under: .vob, burn, convert, divx, dvd, NERO, nero vision
YoutubeGet v4.9.7 Plus Crack
YouTubeGet is an all-in-one software designed to make quick and easy work to download YouTube videos and convert them. Offering a multitude of methods to acquire the videoe, this application has all the power you need while still remaining small and easy to use. After downloading videos it will auto convert FLV files to MP4, 3GP, AVI, WMV, MOV etc. Soon, you can see YouTube videos on your MP4 or Cell phone. The program is very easy to use due to the usability of the user interface and to an interesting feature. When you copy a link from YouTube it will be automatically placed into the URL area of the program if the program is started. So the only things to do after selecting the file to download are: to provide the path and the name for the newly saved file and press the download button. In the unregistered version you can select different output file types but you can't modify their properties.
Features:
- Resume Broken Download
- Download YouTube Videos to Cell Phone, iPod, PSP
- Download YouTube Videos and Burn to a CD/DVD
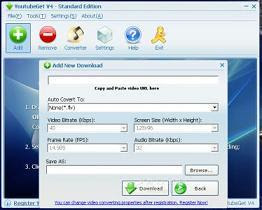
- Clipboard Monitor Helps You to Download YouTube Videos Much Easier
- YouTube Browser
- Easy to Use
- Support AVI, WMV, MOV, MP4, 3GP, MP3 etc
- Build-In FLV Converter
Download
Click To Get Download...
0 comments Filed Under: download, manager, youtube
USB Disk Security 5.1.0.0 with Serial
USB Disk Security 5.1.0.0 / 1 MB
USB Disk Security provides 100% protection against any threats via USB drive, however, the majority of other products are unable even to guarantee 90% protection. USB Disk Security is the best antivirus software to permanently protect offline computer without the need for signature updates, but other antivirus software should update signature database regularly, and they cannot effectively protect offline computer. This light and easy to use solution is 100% compatible with all software and doesn't slow down your computer at all. You pay USB Disk Security once and get it all, however, other antivirus products should be paid for updates every year.
Product Highlights:
100% protection against any malicious programs via USB storage
USB Disk Security uses innovative proactive technology to block any threats via USB drive. There are relatively few products available in shops or on the Internet which offer even close to 100% protection against any malicious programs via USB drive. The majority of products are unable even to guarantee 90% protection. USB Disk Security is the world's best software to block threats via USB drive.
The best solution to protect offline computer
Other antivirus software should update signature database regularly, and they cannot effectively protect offline computer that is not connected to the Internet. When new viruses, worms and other malicious attacks strike, traditional signatures are insufficient. Every minute one waits for a virus signature update creates a window of vulnerability that could have devastating consequences. USB Disk Security uses advanced proactive detection techniques, requires no signature updates, and closes the window of vulnerability left open by other reactive, signature-based responses.
The world's fastest and smallest antivirus software With USB Disk Security, it’s not necessary to sacrifice speed for detection and scanning. Compare antivirus software and you'll discover that USB Disk Security is by far one of the smallest applications in the industry. For example, the v5.0 of USB Disk Security installer is just 1 MB. The program utilizes approximately 1 to 7 MB of RAM.
100% compatible with all software
Incompatibility between antivirus programs is an issue. In the vast majority of cases, installing two antivirus programs from different vendors on one machine (for increased protection) is technically impossible, as the two programs will disrupt each other's functioning. However, USB Disk Security is 100% compatible with all software, including Windows Vista.
Simple to use
USB Disk Security has been specifically designed to perform effectively regardless of the user’s level of computer expertise. Just install and forget it.
System Requirement
100MHz Processor or more, 16MB RAM or more. The operating system should be Windows 95, Windows 98, Windows 2000, Windows XP, Windows NT 4.0, Windows ME, or Vista.
Download
0 comments Filed Under: crack, free, serial, usb, usb disk security
FREE AIRTEL GPRS ON PC !!
hey guys here is the new trick to surf n download free using airtel in PC only
firstly it is not my invention and those who know this trick plz dont flood this blog
by saying its too old
this trick is only for those who dont know this trick..!!
The trick begins :-
1. install proxifier (please comment below with U R email address i will provide u the link)
2.connect ur mobile thru USB/serial/bluetooth (plz see the thread for connecting)
3.u should use the airtelfun.com access point
(There is a option for this in nokia PC suite if u dont have PC suite then do this settings
in your mobile go to settings>connection>Packet Data or gprs>access point now here
you type airtelfun.com)
4.now do this settings in proxifier installed in pc (use the patch i have provided)
go to options>proxy settings>add>type 10.49.16.10 in address n port no.-8080
after that select protocol HTTPS
(if this dont work then go to file n click load settings n select the setting i have provided)
5.thats it u r done but for precautions first use this trick for low data usage n make sure that
ur bal is not deducted
6.use IDM for corrupt free downloads
it works for me so if it works for u then hit thanx i know that it is not my work n i shud not
b credited but i have written all these stuff n provided all necessary things at one place


